
How to create a string art Yinyang wall hanging
- manzuruuganda
- Aug 28, 2022
- 3 min read
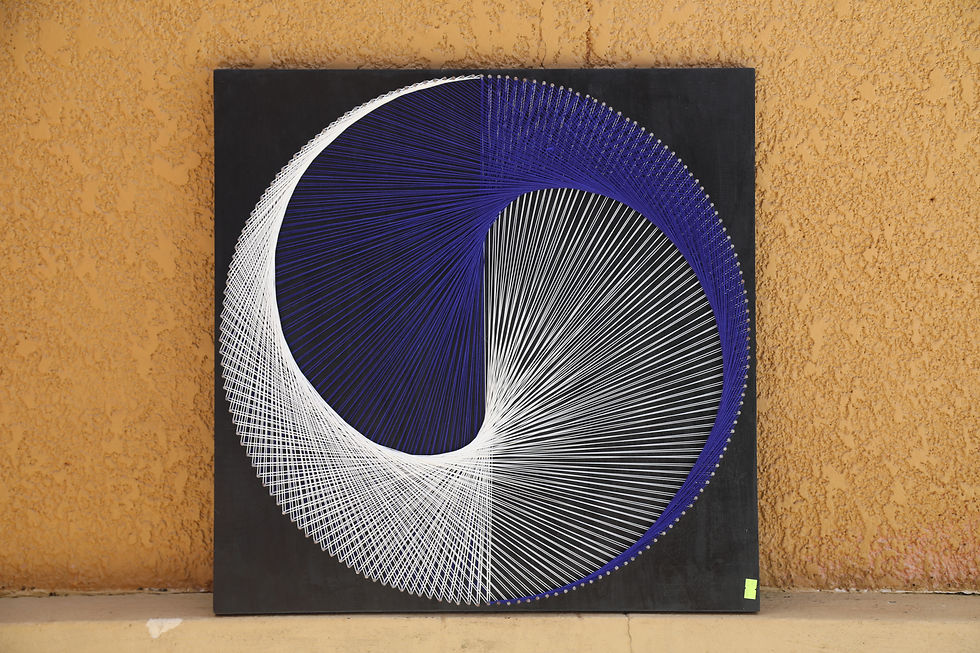
Stringart instructions: Yingyang☯️
By Mary Kyohere -string art student
You will need:
Board
Hammer and Nails
String (1 or 2 colours)
Campus with pencil
Protractor
Ruler
Board preparation (works for both):
1. Identify and mark the center of your board.
2. Using a campus, draw a circle (I used radius 12cm because the boards were about 30cm wide)
3. Draw a line from the center to the outline of your circle.
4. Using the center and the line as reference points, use a protractor to mark off points every 5degrees. Do this all the way round, through 360degrees.
5. Get a ruler that's longer than the radius. Hold the ruler in line with the center and the first 5degree mark. Make a mark on the circle outline where the ruler crosses it. Repeat this for all the 5degree marks all the way around the circle. You should have 72marks.
6. Hammer in nails at each of the marks all the way around the circle.
You are now ready to start stringing.
Stringing first half
1. Make a starting loop. Place this on the nail nearest to you. If using a round board, any nail works. If using a square board, use the nail that's midway of the length.
2. Stretch the string all the way across to the nail directly opposite.
3. Bring the string back towards you and loop it round the same nail you started with.
4. Take the string to the opposite side, but loop it around the nail to the left of the one you used previously.
5. Bring the string back towards you, and still loop it around the nail you started with.
6. Take the string to the opposite side and loop it around the nail to the left of the last one you used.
7. Bring the string back towards you but this time you loop it on the nail to the right of your starting nail.
8. Take the string to the opposite side and loop it around the nail to the left of the last one you used.
9. Bring the string back towards you, and still loop it around the nail you last used (the nail to the right of the starting nail).
10. Note For the nails opposite, the string goes round each only one turn while For the nails near you, the string goes round each for two turns. ie on each turn opposite you go to the next nail to the left, while for each nail near you, you take two turns before you move to the nail to the right.
11. Continue looping opposite side one nail moving left on each round, near end moving right on each second round.
12. As you loop the nails near you, make sure the nail you're looping is always directly infront of you. This way the board gradually turns clockwise through 180degrees so that the starting near nails will soon be on the opposite end.
13. When the double loop nails reach the point you started the single loops, tie off the string and cut.
Stringing second half
The board has turned through 180degrees so the nail nearest you is the nail that was initially opposite. This is your new starting point.
1. Select a second colour for better contrast. Make a starting loop with the new colour. Place this on the new starting nail.
2. Repeat the looping process as above, moving one left on each turn for the nails opposite and one right on every second turn for the nails near you.
3. Your double looped nails will eventually reach the single looped nails and you can tie off and end.
4. Neaten up your piece by trimming and burning off or gluing any hanging bits of thread.


Comments